By Jason Capote
Article from the Manhattan Rose Society Newsletter, Skyscrapers & Roses, October 2018

So now that you read about how easy and rewarding it is to grow roses in containers, I will bet that you are now all gung ho about planning out your patios, decks, driveways, balconies, and stoops with planters upon planters of roses. But most of you might be asking the obvious question, “Just how do I winterize them!” If I had to guess, some of you may have already had an unpleasant experience in the past where a rose that you just loved that was planted in a container and did not pull through the winter. Some of you may have even looked online for information on the subject matter and most likely came away empty handed. I should know, I was once in this situation myself, and until I discovered the following methods, I have lost many beautiful roses to the harshness of winter. The methods presented below are not perfect, but they tend to work in the majority of all cases provided that the instructions are followed as they are written, and as such, I would not plant a prized rose in a container because there is still a likelihood that even if the instructions are followed, a rose may still not come back after a really harsh winter. Second, the three methods presented below are provided in increasing order of difficulty.
Method 1: Planting the Pots
This first method is perhaps the simplest one. Just plant the pots in the ground. That is it. No other special instructions need to be followed. By planting the pot in the ground, you are, in effect, planting the rose in the ground, but have the added advantage of being able to dig up you rose in the Spring when weather conditions permit. This method works great for roses in small pots on patios and decks or for roses planted in hanging baskets, both of which are usually plated with Miniature and Mini-flora roses. The main problem with this method is that it is very difficult to bury, and later in the Spring, to lift out, larger roses that are planted in large containers. Also, in the case of large roses, it more or less defeats the purpose to plant the pot in the ground because if you had the space to do so, you probably would have chosen to plant your larger roses in the ground in the first place. As a result we turn to Method 2.
Method 2: Bring the Pots Indoors for the Winter
This is a more involved process then Method 1, but in some respects is easier. Simply leave your roses outdoors in their pots until they have dropped their leaves and gone dormant, which usually happens after the first real freeze. Then you remove any dead or dying leaves remaining on the bush and move them indoors to an unheated location that receives very little light. An excellent place to move these roses to are to an unheated garage or tool shed. The word here “unheated” is of critical importance. Because most garages and sheds are sheltered locations, most of the time they remain warm enough to prevent the plant from freezing. However, if the location that they are held in becomes ambiently warm, the roses may break dormancy early and start growing possibly causing them to dry from either drying out or not receiving enough light. This is to be prevented at all costs. To keep your roses from drying out, they can still dry out even if they are dormant, it is advised that you provide your large pots with a gallon of water once every two weeks. The pots do not need to be, and should also not be wet, but neither should the soil be allowed to completely dry out. In respect to this matter, use your better judgment. To help you move your roses indoors, you may want to consider placing your planters on wheeled stands to help you move them indoors. The use of a hand truck should also work, but you may risk damaging the pot. While this method is very effective, especially for protecting Hybrid Tea and Floribunda Roses as well as the more delicate Standard or “Tree” roses, it has its limitations. Some roses, such as large Shrubs and Climbers may be planted in large containers that may be too difficult to move effectively or safely for either you or the plant. Second, in the case of us urban gardeners, such as those of us that live in apartment complexes or in row style townhouses, there is simply the absence of any unheated indoor space to move any roses to for the winter. Under these conditions, we move to the most challenging and detailed method yet, Method 3.
Method 3: Overwintering Roses in Containers Outdoors
This is the trickiest method as it is the most detailed, but before I explain, let me make a few statements that add a few conditions to some of the rules normally found online about planting roses in containers.
- Rose selection is of the utmost importance. Since plants in pots effectively have their entirety exposed to the elements, roots and all, they tend to freeze easier then plants that are planted in the ground. As such, cold hardiness of the selected rose cultivars is key. Any rose that is planted in a container that you intend to overwinter outdoors, must be at least hardy to at least 2 zones below the zone in which you live. Since our region of the country is largely in Zone 7, that means that any rose that you expect to survive outdoors for the winter must be cold hardy to Zone 5 and below with roses that are more cold hardy being able to survive better and require less protection to survive. Roses planted to 1 zone below our zone, in our case to Zone 6 may still pull though if they are very vigorous varieties, but keep in mind that doing so is a gamble. Lastly, choose large, own root roses if possible. While budded roses should pull through the cold just fine, mature, own root roses have a better chance of surviving an unusually cold winter as they can return from their roots in the event of their canes significantly dying back. This rule applies not just to roses, but to almost every other woody ornamental plant that is to be overwintered outdoors in a container.
- The choice of the container is important. Roses that are to never be left outside are to never be planted in ceramic or glass pots as these can shatter in below zero conditions or be damaged in the course of moving the plants. Also, choose the largest containers possible for your roses. Not only does this allow their roots more room to grow and expand to produce better quality plants, it also serves to better insulate your plant’s roots in the event of a deep freeze. Lastly, how deep you plant your roses in these containers is of critical importance. The bud union or crown (if planting own root plants) should be planted at least 6 inches below the soil level as they would be if they were planted in cold climate regions of the world. Never fill your pots with soil to be flush to the rim! Leave an addition 6” or more of space from the soil line to the top of your pots to be filled with mulch or compost for the winter to provide greater insulation from freezing and to provide the greatest possible protection of drying out from the winter. Most containers have decorative rings or bands around the pots. Use these as your guide for where your soil level should lie.
- The greatest risk your rose has of dying over the winter is actually not freezing, because as you might have guessed, the ground in which your other roses are planted in also freezes. The greatest threat to your roses is them desiccating (or drying out) over the winter from a lack of water from rain or melting snow and from the cold drying winds that are naturally low in relative humidity. This is true of all woody ornamental plants that are left outdoors in containers and why many evergreens, such as dwarf pines and Rhododons do not survive the winter if they are planted in pots as these plants are not completely dormant and continue to lose water from transpiration and photosynthesis. There are many different methods for preventing desiccation of your container grown roses over the Winter, all of which will be described below.

With that being said, this is the method that I have found to work the best for successfully overwintering roses outdoors.
The first thing you want to do is to pull each container aside and force your roses into dormancy. This is achieved to pruning the canes of your Hybrid Tea, Grandiflora, and Floribunda Roses back to about 18 to 24 inches in length, and by cutting your Climbers and Large Shrubs in half. Then remove all remaining leaves and spray your roses with dormant oil. By the time you are done, all your roses should look like bare root roses that were just potted.
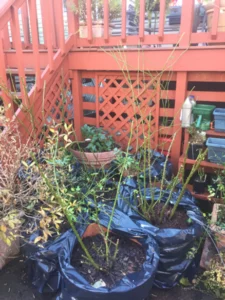
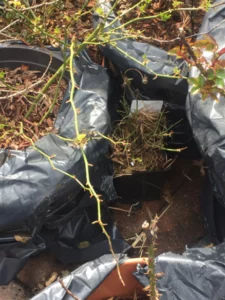
The second step is to insulate the pot. First, fill the pot to the brim with mulch or compost. Second, wrap your pots with black plastic. Why black plastic? This is because black plastic (easily obtainable by cutting apart large black contractor bags) serves a dual function. It not only insulates your pots, but it also draws in heat from the light of the sun’s rays. This helps to prevent desiccation as mentioned above, especially in the event of your roses breaking dormancy during a winter warm spell. What usually happens during a winter warm spell is that your roses are in dire need of water as they are attempting to grow, however, the soil and water in your roses’ container is still frozen preventing the rose from up taking the much needed water. By having your pots wrapped in dark colored materials (and by using dark colored pots for that matter) the pot defrosts at the same time as the plant allowing your plant to remain hydrated.
Third, once the dormant oil dries on your roses, you want to spray them with an anti-desiccant. These chemicals are made of a wax like, waterproof resin that prevents your canes from drying out and dying back from the dry winds. This resin is similar to the wax that your bare root roses are covered in when they are shipped to your home. A good product to use is Wilt Stop by Bonide. Do not worry about this wax preventing your roses from breaking dormancy in the Spring. Wilt Stop is an all-natural resin, is completely biodegradable, and is soluble in warm water. As a result, Wilt Stop and most other commercially available anti-desiccants will need to be reapplied in the winter if we experience a day of over 40 degrees with heavy rain for it to remain effective.

Lastly, you want to corral your pots to keep them warm and protected from the wind. Place them up against your house or a wood plank fence or brick wall if possible. If this is not possible, like would happen if a deck, porch, or chain link fence is in the way, then you must create a loose wind break. Plastic painter’s tarps tied to the lattice work of a deck, porch, or chain link fence works great for this. Huddle your pots in a circle. The largest and heaviest pots should remain on the outside, and the smallest pots should be on the inside of the circle. If you have any miniature or young rooted cuttings in small pots, these can be inserted into the gaps between where the circles of the tops of the pots touch. Don’t worry about these small roses not getting enough light. They will be just fine, they are dormant.

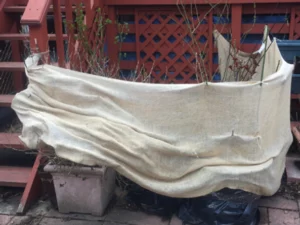
Lastly, wrap the canes of the outer rung of pots with burlap (why burlap, because it provides enough wind protection while letting the roses breathe preventing them from overheating and breaking dormancy in the winter). What you should now have looks like a holding pen of dormant roses. Do not move the roses from this pen until the last threat of freeze has passed! Prematurely moving roses out of this pen, even if they are breaking dormancy, can result in the death of the plants in the event of a late freeze. Also, do not forget to water your roses! The roses in pots cannot be allowed to have their roots dry out as the plant then runs the risk of death from desiccation. If the day temperatures are above freezing during the winter, and there is no snow cover on your pots, and it hasn’t rained in a week or more, crack out the garden hose and provide your plants with a through watering.
If these directions are followed to the letter, for which ever method you choose to overwinter your roses in containers, your roses should be well prepared to survive the long winter and bloom for many season ahead!


