A Little Botany

A Little Botany

by Rich Baer, Master Rosarian and Botanist, Portland Rose Society

This article was originally published in The Portland Rose Chatter, February 2021.


As a person who grew up as a plant person and obtaining a plant education including advanced degrees in Botany, I am very attuned to the lingo of the plant world. As with any specialty there are a lot of words that are unique to the field and are often misused. As long as it does not lead to any communication problems, it really does not matter. If roses have thorns or not is not a major problem, because we all understand what roses do have and what exactly we call them, (the correct word for them is prickles), causes no problems.
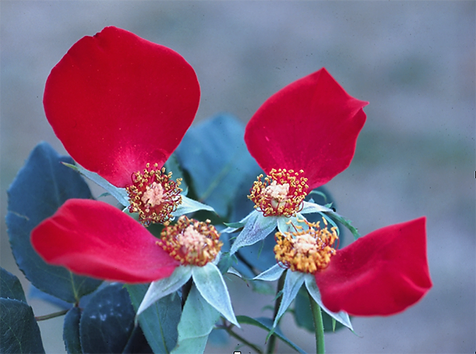
 

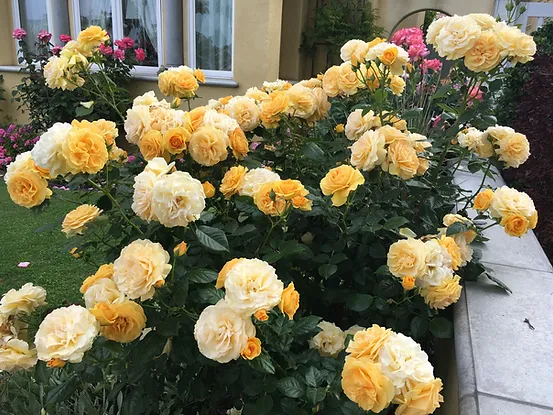
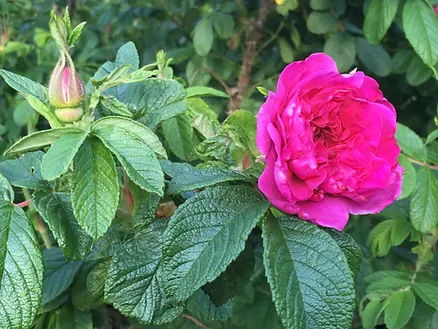
One little phrase for describing the rose classes does however bother me and I have spoken about it a number of times and that is referencing roses that have one row of petals as being single petaled roses. This problem came from exhibiting roses. One rose in a vase for entry purposes is referred to as a single rose. So, then what do we call a rose that has four to eight petals in one row around the bloom? To differentiate it from one rose in a vase it began to be referred to as a single petaled rose. The picture to the right is what a collection of four single petaled roses would look like. In nature there are no single petaled roses. The minimum number of petals in any rose currently known is four which is the number of petals in Rosa Omeiensis Pteracantha, also called the wingthorn rose. This is the rose with the very large red prickles which is the reason those who grow it do so. For the sake of exhibition the American Rose Society has defined a single rose as one which has between 4 and 8 petals. Personally, I find single roses to be very attractive and probably have as many as 20 or more of them in my rose collection.
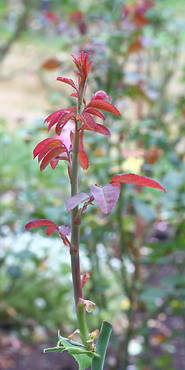
 

Every day that we do go out into our rose gardens we observe the roses growing. I believe that this year (2020) they have done exceedingly well with great vigor and many many blooms. However, do we ever look at that rose growth very carefully and up close? As a botanist I am always watching to see exactly what my roses are doing so that I can gain more appreciation for what I am seeing. A number of visitors to my garden this year have commented on how tall my roses are. I usually reply that because I look at them more as a garden, how high the flowers are is not a concern. The picture on the right represents a typical new stem growing from an old stem at the point that the last deadheading was done.
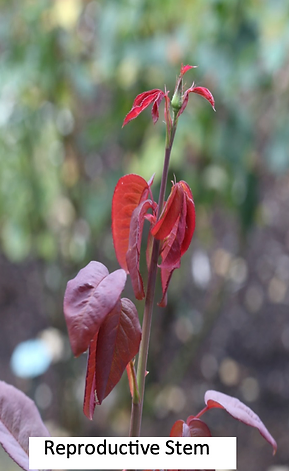
 

The stem typically grows rather rapidly, producing leaves at intervals from nodes along the stem as it grows. At each of these nodes, at the base of the leaf is a vegetative bud. At this point in its growth you will never see any side shoots developing from this shoot. If you look closely at a stem you can find the tiny buds at the very base of each leaf located along the stem. At the very tip of this stem there are thousands of cells called the apical meristem. These cells divide into non differentiated cells. That is, they are not leaf cells or stem cells. They will eventually become specific cells that will grow into leaves and other tissues along the stem as time passes. But back at the tip of the stem, the meristem cells continue to divide and at the same time they are producing new cells, they are also producing auxin, the most well know plant hormone. This auxin travels down the stem and its presence prevents any of the new buds that have formed at the nodes from growing. This is the reason that you rarely see side shoots on the newly developing canes. At a point in time that is determined by several factors, including environment and hormones the vegetative stem will become reproductive. The meristem cells produce cells that become the forerunners of a flower. Once the flower bud begins to grow it occupies the tip of the stem and there are no longer any meristem cells. All of the new parts have been produced by the meristem cells, the stem and foliage beneath them and the growing flower bud above them. The picture “reproductive stem” shows the existence of the flower bud from the tip of the stem. When you can first see the tiny bud it is the first time you will notice that the stem is about to bloom, but the production of this new bud has been going one for quite a while. With the disappearance of the meristem cells there is also no more production of auxin at the tip of the stem. The reduction in the concentration of auxin in the stem allows the previously inhibited buds near the tip of the stem to begin growing. Depending upon the variety of rose, the number of these stems which will begin growing can vary. You probably know that part of the definition of the hybrid tea rose is one that grows with one flower per stem. Without disbudding, you rarely get just one bud and flower per stem, you usually get more than one bud at the tip of the stem.
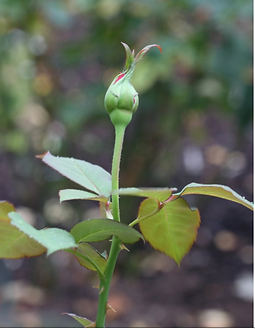
The picture left represents what a single bloom looks like. There is the developing flower which is attached to the plant by a stem. However, this attaching piece is not a stem but varies from any other stem on the plant in several ways. This structure also has its own unique name and is called the “peduncle”. The most obvious difference you can see by looking at it is that it has no nodes. No leaves have developed along its length. It does however originate at a leaf node, much as any other stem on the rose plant. If you deadhead by snapping off the dead flowers this peduncle usually cleanly snaps off at its origin when you push it over. If you do remove dead flowers this way, just grasp the peduncle between thumb and forefinger and bend to the left or right. After it breaks off, look at the tip of the stem left on the rose bush and you will see at its very end a leaf. It may be a regular leaf that you will recognize as a leaf, or it may be just a little green fold which does not look like a leaf but it is. If you tried to break a rose stem you will not find that it will cleanly break away from the plant as does the peduncle. Sometimes the peduncle will not snap off cleanly but usually it does. If you have tried deadheading this way you know what I mean.
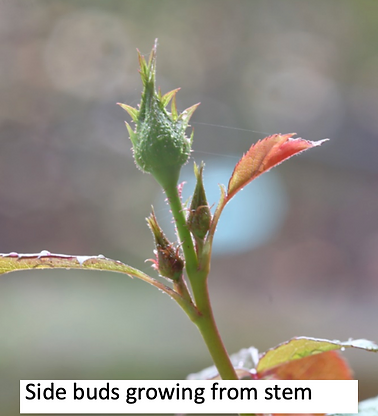
Almost always after you see a stem become reproductive with a flowering bud at the tip of the stem, you will see additional buds beginning to grow as well. With the absence of auxin to inhibit the growth of the side buds on the rose stem, they often begin to grow. As you can see in the picture on the left we often see side buds beginning to grow from just below the peduncle. In this case, you can see the two nodes, they are at the base of the leaves projecting to the right and left. From the very top node the peduncle of the new bloom is growing, as is one of the side buds. In hybrid tea roses it is often the norm that at least the top two nodes will produce side buds. If you could watch the progress microscopically, what you would see would not be just the emerging of the two side buds. The bud at the base of the leaf would begin to grow just like any bud on the bush. However, it would not grow like a stem for very long. It quickly changes to a reproductive stem and begins to produce a peduncle and bloom. However, the stem often will grow enough before this happens to produce enough normal rose stem to have two or three leaves and thus nodes. So, each of these side buds is produced just like the major bud that is at the tip of the stem. In most cases the buds at the nodes on these side bud stems do not grow, so we have the main bud with an indeterminate number of side buds.
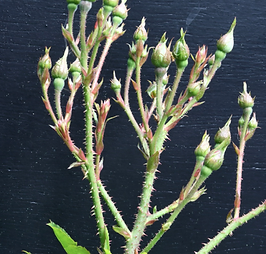
Everything is the same for each of these side buds as it is for the major bud that originally was produced. So we have stems with tiny leaflets at two or three nodes below the peduncle and bloom. The same thing can happen here that happened to the main stem, side buds can begin to grow. They can grow with the same results as we had before.
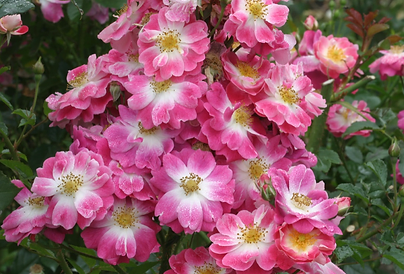
They will produce very small stems that can have several nodes and tiny leaves and a bud and peduncle on their end. This can lead to a very large spray of roses being produced at the end of the main stem if they are allowed to proceed. This is what happens in the case of many of the floribunda roses and other roses which are grown as landscape roses for color.


The picture above depicts the blooming of one such rose called Greetings, a shrub rose from Jackson and Perkins. The main bud can be seen in the center and is showing color. You can follow the progress of this spray in the stems below. Below the main bud side shoots began to grow and produce stems and buds. Then from those shoots additional side shoots grew and produced buds and there are places in this spray where there is a fourth group of buds being produced. All of the stems and peduncles grow from a node that is marked by the presence of a rudimentary leaf, but a leaf just the same. There are no peduncles which originate from other peduncles and there are no stems that do not originate from other stems.


In this case the original terminal bud will bloom first, and then all of the first wave of side buds will bloom at the same time. Then each additional wave of buds will mature and bloom in sequence. That is why disbudding large sprays can become tedious to the exacting exhibitor. But in the garden, we just let them bloom to produce the great color spots that they can become.


There was a reason for trying to establish how flowers are produced on the ends of rose stems and the importance of the peduncle. The peduncle exists from the bottom of the bloom to the first node from which it came. In this case the node can be easily seen because there is a leaflet growing from where it emanates from the stem. There is no incidence in which one peduncle arises from another peduncle, they always begin at a stem node and end at the base of the growing flower.
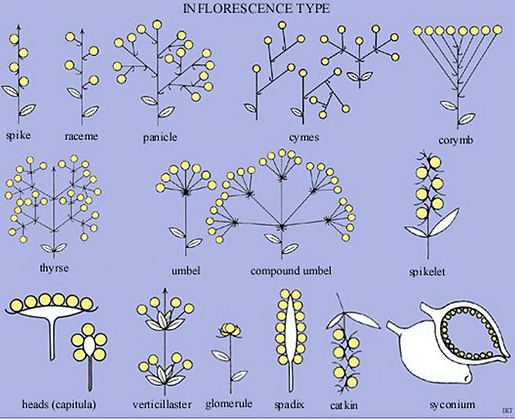
Plant Taxonomy is the science that finds, identifies, describes, classifies and names plants. Every part of the plant is examined in determining how to classify it. The reproductive parts are very important in the classification of plants overall. The way the flowers are arranged when they bloom is very important as well. In roses, the presentation of the flowers is very much at random. The vegetative tip produces a bud and then all sorts of different combinations can occur below the first bloom. In many plants the presentation of the blooms is not at random, but occurs in a specific way for any one variety of plant and the presentation is called an inflorescence. The names of most of the different types of inflorescences are probably not known to many, but there are a few that are familiar. Probably the most common would be the head. This is the type of flower presentation in plants such as sunflowers. There is one peduncle formed at the tip of the vegetative stem, just like in the rose, however that peduncle begins to divide and re-devide many times over. The stems that are produced by this division of the peduncle are called pedicels. In the case of the sunflower each of the pedicles produces a flower at its tip and they grow such that the structure that we know as a sunflower head is formed. In the representation to the left are many of the different ways that plants produce their flowers. In any one type of flower, sunflower for example, every time the vegetative stem becomes reproductive and produces a reproductive peduncle a head will be the result. The type of inflorescence formed by any one variety of plant will always be the same because it is in the genetics of the plant to grow that particular way. A rose may randomly produce a spray of blooms that resemble one of these classic inflorescence types, but it will not be a repeatable event. The occurrence will be strictly accidental since the genetics of the rose cause it to produce its flowers in the way previously described with each bloom arising from the stem of the plant on an individual peduncle.


Another common type of inflorescence is the umbel. The peduncle that is produced branches into any number of different pedicles each having a flower at it tip. Probably one example known to gardeners would be either the carrot, or Queen Anne’s Lace. You can turn the flower over, the inflorescence, and see how the peduncle is divided over and over again producing the classic look of the Queen Anne’s Lace flower head. In each of examples in the diagram you will notice that the peduncle is emerging from the last leaf on the stem and then there are no leaves on it as it grows and divides.
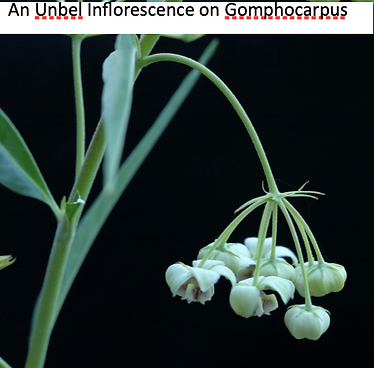
 

As a botanist I observe what is going on in the garden at a little different level than the average gardener, which is not necessarily good or bad. But I think that the more you know about the things you enjoy, the more that you can enjoy them. I have a number of plants growing in pots that I am able to observe closely almost every day of their growing cycle, including one that has fascinated me for the last three years. When I first saw Asclepias physocarpa in a catalog, I knew I wanted to experiment in my garden with it. The taxonomist recently renamed it to Gomphocarpus physocarpus, but it is the same plant. It has many common names, including balloon flower, and family Jewels tree. But it is a member of the plants that Monarch butterflies feed on. I would like to see them in our part of Oregon. I have never seen one here in my over forty years of gardening here, but there is always hope. This plant produces flowers in an inflorescence known as an umbel, you can find it in the diagram of types. The peduncle originates from a node on the stem of the plant and grows and then it begins to divide into pedicels, normally with this plant there will be five to seven, each of which will bear one flower. I have nine of these plants growing around the yard, all of which are over 8 feet tall and there are literally thousands of blooms on them and every one of them is produced by exactly the same type of structure, the umbel. There is no randomness to all of the flowers, every one of the inflorescences looks exactly the same. So, you see that it certainly is not a random occurrence that the flowers are produced in umbels, the genetics of the plant makes every one of them the same. Going back to the rose, you might find five or six blooms that are presenting themselves such they look like they are an umbel, but it will certainly be random and will not repeat with any regularity and besides, each one of the blooms would be on its own peduncle.


The usage of the word inflorescence has become the dominant way that rose sprays are described in the judging guidelines for roses. I believe that the term is being misused and all collections of rose blooms on one stem should be referred to as sprays. In referring to the individual blooms of a spray the term floret is often used to describe them, and I believe that botanically this is incorrect as well. The word floret botanically refers to the tiny flowers of some grasses. It is correctly used for the flowers of cauliflower or broccoli or members of the compositae family like sunflowers.

WHAT COLOR IS THAT ROSE?, OH, NO COLOR!

Back when I worked for Edmund’s Roses when they were in Wilsonville, Oregon I got to talk to many people and try to answer their horticultural questions. One question often repeated was about rose colors. Is there a blue rose, or is there a black rose?
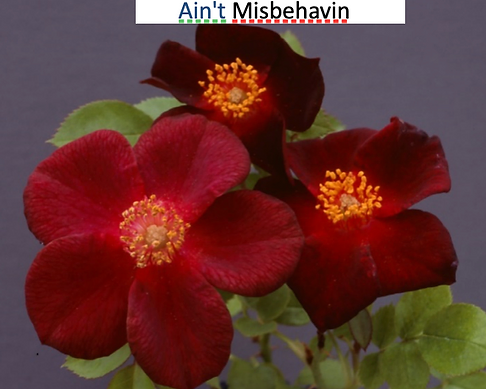
I could understand people wanting a blue rose because it is the only color that roses do not come in. However, black! If you had a black rose in the garden there would appear to be a hole in the bush where the flower was. Black items by nature do not reflect any light so you would not be able to see a truly black rose. Later I was honored to be part of the production of a book called “The Quest for the Black Rose” by Ingrid Verdeem around 2006 by describing many roses which were considered near black. It is still available used on e-bay for around $80. It was a giant of a book at the time measuring 17 inches by 13 inches and it does not fit anywhere on my bookshelves. I however I have a special place for it. A couple of the prominent and known roses to be discussed were Black Baccara by Meidiland, and Ain’t Misbehavin hybridized by Sean McCann.
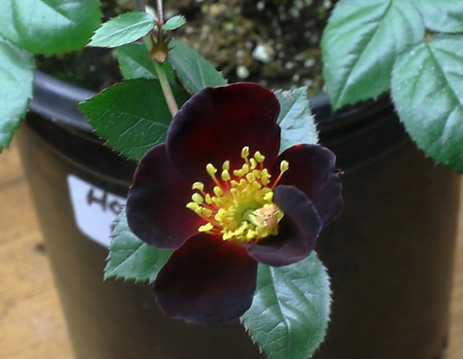
When Sean’s rose was released around 1990 it was hailed as being very close to a black rose, but in reality it is consistently a very, very dark red. One of its parents was Black Jade, a long time favorite in our garden for being very dark red as a miniature. Last year when a planted rose seeds for the first time, one of the roses I took seeds from was Hoot Owl a Jerry Justice hybrid which is a medium red single miniature with a white eye. It was selected because it had an abundance of nice-looking hips when I pruned it in February. I was able to get a number of plants from the seeds of Hoot Owl which spanned the color spectrum from white to dark red, all of them singles. Because the plants were still small last fall, I moved a number of them into my garden shed where I continued to grow them under lights. What a surprise it was on the morning of January 21st, when I went out to water them to find a bloom on hoot 4 which gave me a thrill of seeing what I considered the first truly black rose I have ever seen. It was beautiful in its own way, but mostly for its uniqueness. This seedling had bloomed earlier during the summer outside and it very much resembled Ain’t Misbehavin when grown outside with a good dose of ultraviolet rays. But grown inside, it was a whole different rose. I do not think will bes, but it sure was fun seeing what I believed was a first black rose. Just as an aside, the picture was not underexposed to make it darker than it actually was, and you can tell that by the naturally colored green in the leaves.


Photos by Rich Baer
Tips, Tricks & Hacks of Rose Care – Tool Talk & Spring Tips

This article is from Roses & You, March 2019

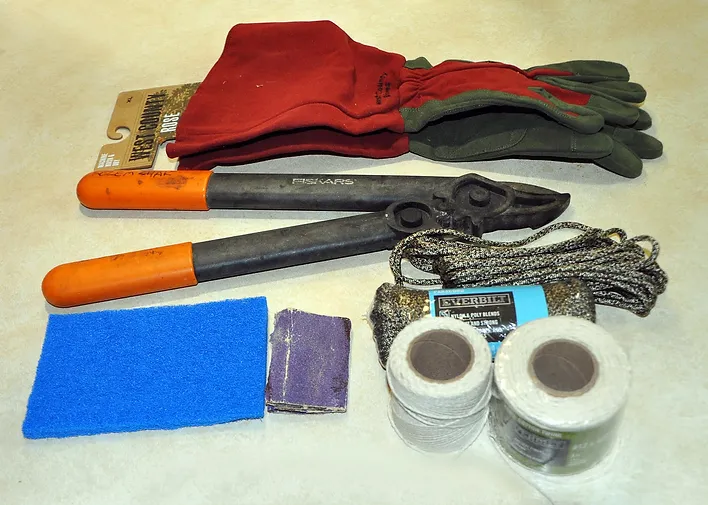
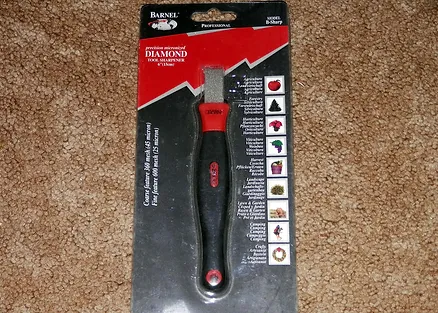
First thing… Before gardening season starts, clean your pruners. Oven cleaner works very well for removing the built-up blackened sap from the blades of your pruners. Spray the cleaner on the blades and let it soak for five minutes or so, then wipe them off. If there is still more residue, spray them again and repeat. If the buildup is not all coming off, you can use steel wool or a scotch brite pad to help remove it. Rust can also be removed this way. Sharpen the pruners next. I use a Barnel diamond edge sharpener I had gotten from the Harlane Company- www.harlane.com. Frank Benardella said he used a diamond chip nail file which worked very similarly. When sharpening, only do the edge from the angled side and match the angle which is on the blade. After you’re done with the beveled side, turn the pruners over and remove any burrs on the flat side by holding the sharpener flat against the blade very lightly pulling it toward the sharpened edge. Once the pruners are sharpened, spray them with WD-40 or a similar lubricant.


Being left-handed, I use a Felco #9 pruner. I found no matter how sharp a right-hand pruner was, the cut was not always clean, this solve that problem.

After breaking or seriously dulling pruners or loppers, I think I finally learned to use the right tool when pruning heavier or hard canes. My arsenal now includes ARS 2’ extended handle cut & hold pruners, a 15-inch Fiskars power gear lopper, 32-inch Fiskars power lever loppers, 5’ Fiskars pruning stik®, and a folding Stanley pruning saw. The extended handle pruners and pruning stik® are very helpful for pruning climbers or large shrub or OGRs, because you can reach most tops without a step stool or ladder. The older we get, the less climbing we want to do.

A good pair of leather gloves is also recommended too, the gauntlet styles are even better. If yours get like mine, with holes in the fingers, consider replacing them. Anyone who does not wear glasses should also consider eye protection when trimming or pruning your roses. Canes have a habit of whipping in the wind or snapping back toward you, and you want to protect your eyes!

I have always used cotton twine tying up my climbers. It last for about a year, so I usually retie them each year when I prune. One year I did not, and my huge Laguna climber crashed to the ground. Now I make sure I use a heavier paracord, which I got at Home Depot, to secure the main canes on my large climbers. This will never break, and I have been able to untie it fairly easily and reuse it to fasten the canes year after year. It is available in tan or green camouflage, so it blends in very well. I still use the cotton twine for smaller canes or temporary fastening.​

Before we get busy in the garden, spring is a good time to check to see if you have had a tetanus shot in the last 10 years. It is recommended every 5 years, but no more than 10. If not, you should schedule one as tetanus is a soil borne disease and it is easy to get scratched when working around roses.

Basic Pruning Principles

Basic Pruning Principles

To ‘prune’ – “to lop or cut off the superfluous parts, branches, or shoots (of a plant) for better shaped or more fruitful growth; to shape or smooth by trimming; to cut off or cut out (dead branches from a rose bush).” In colder climates the removal of dead branches may well be the prime activity, but in warmer climates the main emphasis is certainly on the opportunity to shape the bush for the Spring bloom. It is this practice of regulating the shape that can enhance the landscape ambiance of the rose garden and ensure a vigorous first bloom that makes the effort all worth while. Second, the act of pruning if approached logically can encourage new basal growth from the bud union – usually regarded as strong evidence of good health. Third, the removal of old wood and damaged or diseased parts can allow a recuperative process to take place for increased growth power.


This removal of branches and sometimes old canes serves as a form of dormancy in warm climates since it cannot be achieved naturally. Since it has been proven that it is a healthy habit to allow rose bushes a period of non-production, the act of pruning does permit a time period where the governing biochemical processes are slowed down and redirected to produce that first magnificent spring bloom. In greenhouse production, for instance, the rose bushes are never given a formal prune to allow them to rest, but are groomed continuously to produce flowers for certain special holidays and events. Within a few years they burn out or become poor performers and have to be replaced. Allowing a rest period each year prolongs the life of the bush and makes sure that bloom quality and quantity is maximized for the home garden. It is often remarked that the first bloom cycle is the most attractive and the spring rose shows certainly prove that conclusion. The growth pattern in that first bloom cycle is the beneficiary of the forced redirection of stored nutrients via proper pruning.

EQUIPMENT NEEDED

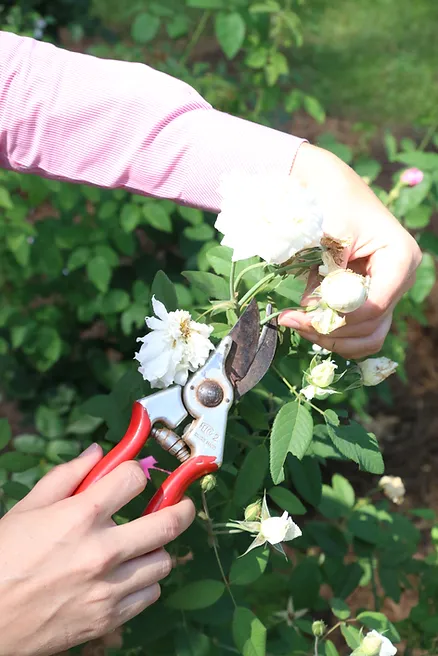
Above all else, investment in a pair of high quality pruning shears is mandatory. After all the expense of buying the rose bush and the planting process, you have already invested about $10.00 to $20.00 per bush. A good pair of pruning shears from Felco® (Swiss Import) or Corona® (made in California) will cost between $25.00 and $40.00. There are other manufacturers, but these two companies have track records for providing the highest quality products. The pruning shears should be the scissor type not the Anvil type. Felco has a special hand grip designed for left-handed people, swivel handles, and even a model with removal blades for maintenance. For miniature roses, there are smaller versions of these pruning shears which rely on a smaller blade surface.

For removal of large woody canes at the bud union a pruning saw from Corona will allow access for flush removal. Attempts to use pruning shears for these jobs usually results in damage to the bud union. It is best to approach cane removal with a proper saw designed specifically for the job.

For cutting large diameter canes a pair of lopping shears with 18″ handles can facilitate the cutting without placing too much pressure on your hands. Again, attempts to cut large diameter canes with pruning shears will require a lot of extra strength in your hands. The lopping shears with long handles solve the strength problem and makes the cut clean and sharp.

Invest in a small wire brush (about 2″ wide by 3″ deep) to help remove loose bark away from the bud union. Such treatments can encourage basal breaks and stimulate new growth since growth often finds it impossible to break through the heavy tree-like bark encountered on older bushes.

Finally, save on profanities while pruning by buying a good strong pair of thick leather gloves that are puncture proof. There is nothing so irritating than a thorn under the nail to cause a string of words rarely heard in a rose garden!

THE ANGLE TO CUT

By far the most important technique to master in pruning roses is the correct angle and direction of the primary cut. The final pruning cut should be made at approximately a 45 degree angle, about 1/4″ above a leaf axle where there is a dormant eye. (See picture at right.) If the bush has foliage present, the cut location is easy to find. However, cuts are often made further down canes where there is no foliage to guide you to the appropriate cut. Under these circumstances look for the dormant eye on such canes by locating where foliage was once connected. The eye is normally visible as a slight swelling above the surface of the cane. Making these primary cuts is the key to success in pruning. To help understand the importance of making such cuts, the following diagram illustrates five ways to perform it, but only one that is correct. The cut should be made such that the growth that will eventually emerge from that eye will naturally point away from the center of the bush. This deliberate planning of new spring growth patterns is what gives the rose bush a pleasing overall circular shape that spreads from the center outwards. Such cuts avoid the growth from being directed inward and colliding with other stems. The basic logic behind making the cut slope down and away from the eye is that the excess natural sap that will rise to seal the cut can pour down the opposing side of the cane and not interfere with the developing eye. Master these two simple rules and the shape of your spring growth will be guaranteed to give an overall pleasing growth habit for the rest of the year.

1. The classical correct cut.

2. Cut too far above the eye.

3. Cut too steep an angle above the eye.

4. Wrong direction of angle cut.

5. Cut was badly executed, but more seriously a new pair of pruning shears is required.

GENERAL TIPS ON PRUNING

A number of general points of advice for good pruning can be outlined.

1. Always prune cut to good healthy tissue easily recognized by the green bark on the outside of the cane and white pith core revealed after the cut is made.

2. To accelerate the sealing process after the cut is made, a drop of carpenter’s glue (or nail polish or black pruning sealer) can ensure a quicker recovery as well as provide an instant protective barrier against cane borers (those insects that drill several inches into the white pith core and deposit their eggs.)

3. Prune to ensure the center of the bush is open for maximum air circulation, i.e., canes emanate from the bud union like spokes of a wheel with no cross-overs or interferences. Imposing this type of architectural structure on the rose bush will help prevent powdery mildew in the Spring via good air circulation within the bush. Additionally the overall shape of the bush will be pleasing to the eye when blooms finally appear.

4. Plan to remove all weak or twiggy growth on main canes that is and not capable of sustaining a reasonable thickness of stem. Hybrid tea blooms need a stem about pencil thickness or greater for support.

5. Remove suckers if present (i.e. growth from the root structure below the bud union). Remove them from as close to the main root cane below the bud union as possible. Suckers can only appear on varieties that have been budded such as hybrid teas. The sucker represents the growing habits of the understock used for budding, usually Dr. Huey. If allowed to grow, the sucker will eventually take over the whole bush and suppress the variety budded onto it. Understock varieties can easily be recognized by their flowers (pink and five to twelve petals in the case of Dr. Huey).

6. Remove old canes that appear woody by sawing them off as close to the bud union as possible. Make this cut clean and smooth. Should any stubs from bad cuts made last year remain, saw them off cleanly. Finally, apply a wire brush to the woody epidermis of the bud union to loosen and remove any dead tissue to promote basal activity.

7. Remove any remaining foliage from the canes after pruning has been completed, and clean up around the bush discarding all foliage as trash.

Basic Rose Terminology

When speaking about roses it makes it much easier if all of us use the same terminology. The following is a list of basic terms used to describe rose plant parts. It is a lot easier to understand what someone is talking about when they say “sepals” rather than “… you know, those little green things just under the flower …”

  • Anther – The upper portion of a stamen which contains the pollen sacs.

  • Apical Meristem – Non-maturing cells located at the tips of shoots and roots which produce the plant hormone auxin.

  • Auricle – The ‘ear-like’ projection found on the tip of the stipule.

  • Auxin – a plant hormone that regulates the bloom cycle for rose buds.

  • Axil – the angle on the upper side where the leaf and stem join.

  • Axillary – A term applied to buds or branches occurring in the axil of a leaf. These buds begin to grow after pruning or deadheading.

  • Bark – The outer layer of the stem of a rose.

  • Bud – An embryonic shoot that may eventually produce either flowers of foliage.

  • Bud Union – That area between the roots and the stems where the bud of the desired variety was grafted onto the rootstock.

  • Bract – A leaf unlike the ordinary leaves which is usually smaller or of a different shape, growing from the peduncle just below the flower.

  • Calyx – The first of a series of flower parts growing from the peduncle, composed of sepals, usually green and leaf-like.

  • Cane – The stem of a rose, either the main stem (which then becomes the trunk) or lateral stems or branches.

  • Carpel – An organ bearing ovules along its margins; part of a compound pistil.

  • Compound Leaf – A leaf composed of two or more parts or leaflets. Rose leaves are pinnately compound.

  • Corolla – The second of a series of flower parts growing from the peduncle, composed of petals.

  • Double – Referring to how many petals the rose has – usually between 25 and 45.

  • Filament – The stalk of the stamen which supports the anther.

  • Floral Tube – A cup-like structure formed by the fusion of the basal parts of the sepals, petals and stamens. Don’t call it a ‘calyx tube.’

  • Fruit – A ripe ovary containing seeds and any adjacent parts.

  • Hip – The fruit of the rose which contains the seeds.

  • Leaf – An organ arising laterally from superficial tissues of a shoot apex. It is usually flat and may be simple or compound.

  • Leaf Scar – A mark left on the stem where the leaf detaches. There is a bud just above each leaf scar.

  • Meristem – Tissue composed of cells that do not mature, but remain capable of further growth and division. Present in growing tips.

  • Mixed Buds – Buds that produce both leaves and flowers; usual type of bud on roses; present in leaf axils.

  • Ovary – The swollen basal portion of the pistil containing the ovules or seeds.

  • Ovule – A structure containing the embryo sac, nucellus, integuments and stalk. After fertilization this develops into seeds.

  • Peduncle – The main stem of a an individual flower or of a spray.

  • Pedicel – The stem of an individual flower in a spray.

  • Perianth – The collective term for the calyx and corolla (sepals and petals) combined.

  • Petal – One of the units of the corolla of the flower. Roses have from four to over 100 petals, depending on the variety.

  • Petaloid – A transitional phase between petals and stamens. Petalloids are visible in single and semi-double roses as deformed-looking petals in the center of the rose.

  • Petiole – The stalk of the leaf.

  • Petiolul – A subdivision of the petiole which connects the lateral leaflets to the petiole.

  • Pistil – The central organ of the flower composed of one or more carpels and enclosing the ovules.

  • Pith – The soft inner portion of a rose stem.

  • Pollen – The granules within the pollen sacs containing genetic information used for sexual reproduction.

  • Prickle – A spine-like superficial outgrowth of the stem. Roses have prickles, not ‘thorns.’

  • Roots – The underground parts of the rose used for support and to absorb water and nutrients.

  • Rootstock – The cultivated roots of a rose which will be implanted with a bud from another variety (grafting).

  • Semi-double – Referring to how many petals the rose has – usually 12 to 25.

  • Sepal – One of the units of the calyx. These are the green coverings of a flower bud that open to reveal the petals of the rose. Roses usually have 5 sepals.

  • Single – Referring to how many petals the rose has – usually four to eight.

  • Spray – Several flowers buds which arise from one peduncle and develop into many flowers on short pedicels.

  • Stamen – The organ of the flower producing pollen, composed of an anther and a filament.

  • Stigma – The top of the pistil, the part that receives the pollen grains.

  • Stipule – A leaf appendage that is usually present in roses on the petiole where it meets the stem.

  • Style – The part of the pistil that connects the ovary and the stigma.

  • Terminal – A term applied to buds occurring at the end of branches. The end or tip.

  • Thorn – A branch of a plant that becomes woody, hard and pointed. Cactus plants have thorns, locust trees have thorns. Rose do NOT have thorns as the ‘prickles’ on a rose do not develop from ‘branch’ tissue.

  • Trunk – The main stem of a rose, the cane that later produces all the side branches or lateral canes.

  • Vegetative Bud – A bud that produces only leaves and never flowers. Roses do NOT have vegetative buds.

Food for Thought about Fertilizing Roses

Food for Thought about Fertilizing Roses

Nanette Londeree, Master Rosarian, Marin Rose Society

We gardeners routinely describe fertilizing as “feeding” our plants, but that’s not really accurate. Plants “feed” themselves, producing their own food in the form of sugars through the process of photosynthesis. We add nutrients, chemical elements necessary for plant growth, to supplement those naturally occurring in the soil. Consider how Mother Nature does it in a forest – fallen leaves and dead plants slowly decay; through lots of biological activity, their nutrients go back into the soil and are available to, once again, be taken up by living plants. By fertilizing, we’re doing the same thing – making nutrients available to the plant via the soil. Fertilizing is all about enhancing the soil, in fact, a common definition of the word fertilizer is, a substance used to make a soil more fertile.


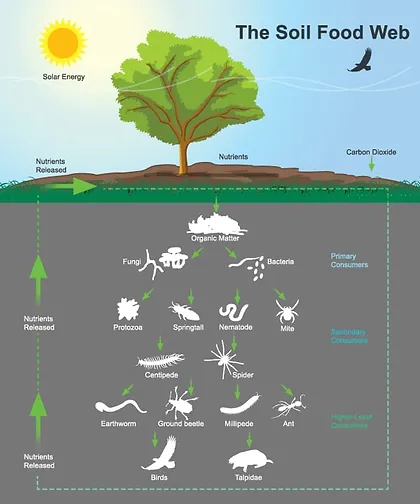
What you see going on with your roses above the ground is largely determined by what goes on below your feet; the top four to eight inches of soil is where plants mostly get their nutrients. No matter how much you baby your roses, if the soil isn’t functional and healthy, it won’t matter much. The living component of soil is perhaps the most important to overall plant health. A single spade full of rich garden soil contains more species of organisms than can be found above ground in the entire Amazon rain forest. Commonly referred to as the soil food web, the vast community of organisms live all or part of their lives in the soil. All plants depend on the food web for their nutrition. Managing for soil health is about developing and maintaining a suitable habitat for the many creatures that comprise the soil food web.


BELOW: Hendrikus Organics


Many gardeners fertilize based on the calendar rather than what is actually needed by the plant. Do you know if the nitrogen, phosphorus, and potassium are actually low in your soil? Have you confirmed that magnesium is lacking before adding Epsom salts? You can save yourself time and money by testing your soil with simple test kits; when you know what is deficient, then add just what’s needed. More is not better with many fertilizers; too much of certain elements can result in damage to plants or soil organisms. The next time you’re thinking about fertilizing, consider a few things:

  • What does your soil need? Is it low in all the major elements, nitrogen, phosphorus, and potassium, or just one of these?

  • Will adding the material result in too high a concentration of a given nutrient?

  • Will the material added to soil provide organic matter that is beneficial to the organisms in the soil?

  • Is the material safe for the soil food web, pollinators, or other beneficial creatures?

  • Could the material contaminate groundwater, or result in pollution of watershed through runoff?

Included below are some common materials routinely used to “feed” roses; a few are touted to do great things for our beloved flowers, but is that really true? Read on and you decide:


Alfalfa (Medicago sativa), is an herbaceous perennial plant in the legume family. In addition to low levels of nitrogen, phosphorus, and potassium, it’s rich in protein, vitamins and minerals and breaks down slowly in the soil. It contains triaconatol, a naturally occurring fatty alcohol that is a growth stimulant. It can trigger new basal breaks – that desirable new growth at the bud union or base of the plant, in addition to increasing overall plant vigor and flower production. Be aware that the succulent new growth produced can be an attractant to aphids.


Bone meal is primarily calcium and phosphorus, two elements required for plant growth and that are usually in adequate concentrations in garden soil. Phosphorus, from bone meal or other sources, does not stimulate plant growth or promote flowering; it is only a mineral, not a plant growth regulator. High concentrations of either mineral can be a problem. According the American Rose Society’s (ARS) Consulting Rosarian Manual, symptoms of too little phosphorus: “Older foliage drops without turning yellow. Leaves are dull gray-green in color. Buds slow to develop, leaf edges of older leaves may cup down.” Gardens in high rainfall areas will likely need more potassium and nitrogen, but phosphorus is rarely ever limiting to plant growth in non-agricultural soils.


Epsom salts are the naturally occurring mineral magnesium sulfate. In general, magnesium plays a role in strengthening plant cell walls, allowing the plant to take in the nutrients it needs. The first symptom of a magnesium deficiency in roses is a reduction of leaf size, followed by entire leaves being chlorotic with yellow between veins. The routine addition of Epsom salts can lead to salt accumulation in the soil and create toxic conditions. Roses are not salt-tolerant; symptoms of salt toxicity include leaf tip dieback, marginal leaf chlorosis and necrosis (or burn). In an evaluation of Epsom salts uses in gardening and the often-claimed growth promoting benefits for roses, Linda Chalker-Scott, Ph.D. from Washington State University Extension Service notes “There is no published, scientific research on Epsom salts effects upon roses. The origin of these “research-based” recommendations is unclear.”

Controlled release fertilizers can appear to be a huge benefit to the gardener. They consist of water-soluble fertilizer encased within a polymer coating, forming a round prill. The polymer coating has small holes in which water passes into the prill, solublizes the fertilizer and then the fertilizer slowly leaches from the prill. The rate of the break down and release of nutrients is impacted most by soil moisture and temperature. Moisture is needed to begin the release of controlled release fertilizer. If the soil dries out, it can greatly reduce the amount of fertilizer released.


Multi-purpose products, often marketed as “All in One” or “3 in 1” contain a mixture of fertilizer, insecticide, and fungicide. Using this type of fertilizer product when there is no specific insect pest or disease present adds pesticides to the soil for no purpose, may negatively impact soil organisms, bees and other pollinators, and is much more expensive than single use products.


Remember, Healthy soil = productive healthy roses!

The Rose-Phosphate-Mycorrhizae Connection

The Rose-Phosphate-Mycorrhizae Connection

by Rita PerwichConsulting Rosarian, San Diego Rose Society.

Rosarians generally spend a lot of time tending to their roses. Plain and simple: a beautiful rose garden requires dedication and care. What if you find out that some of the practices you have been dutifully following may not be good for your roses? I know that thought turns me inside out and upside down! Which aspects of rose care should be re-examined? Are there any that should be retired from practice? Are we wasting our time and our money, and worse yet inadvertently harming our soil and our roses with some of our good intentions? The use of phosphorus fertilizer and myccorhizal activity in our soils are two topics that bear on each other and need to be examined.

(ABOVE: ‘Julia Child’ by Rita Perwich.)


Phosphorus:

A handful to a cupful of phosphate fertilizer placed in the bottom of the planting hole by rosarians is common practice because phosphorus is not mobile and rosarians want to ensure the rose has adequate phosphorus for root development and beautiful blooms. In San Diego, we continue to add this macronutrient to our fertilizing regimen which commences in early spring and ends in mid-October.


Mycorrhizae:

A few years ago many of us had not heard of mycorrhizae. Now we all want to have it in our soil. Mycorrhizal fungi in the soil have been symbiotic ‘plant partners’ for millions of years. Roots of plants under mild nutritional stress release chemical cues that stimulate mycorrhizal growth. The mycorrhizal hyphae penetrate cell walls of these receptive roots creating passageways between the partners. Large networks of fine filaments or hyphae extend beyond the root mass helping plants access soil water and mineral nutrients from otherwise inaccessible areas. In return, since mycorrhizae are non-photosnythetic and unable to produce their own food, the plant transfers back nutrients through the hyphae to its symbiotic partner.


Benefits to Plants Colonized by Mycorrhizae:

  1. The mycorrhizal network increases root mass which helps provide plants with a more consistent water supply enabling the plant to keep its stomata open longer and thereby assisting the plant in the process of photosynthesis;

  2. One of the main benefits of mycorrhizae is the mobilization and uptake of phosphorus which is especially important in alkaline or nutritionally deficient soils. Mycorrhizae can easily solubilize rock phosphate which is difficult for plant roots to mobilize. When plant roots perceive a lack of available phosphate, they are receptive to mycorrhizal infection and subsequent uptake of this phosphate source;

  3. Colonization of plants by mycorrhizae provides more resistance to pathogens such as Verticulum, and pests, including nematodes, and limits the available space for colonization by other pathogens;

  4. Mycorrhizae can protect uptake by the roots of toxic minerals such as aluminum, chromium and lead;

  5. Mycorrhizae release enzymes that free nutrients from the soil for plant use reducing the need for additional fertilization;

  6. Mycorrhizae can ameliorate salt stress.


Mycorrhizae can be Damaged

Mycorrhizae can be damaged and unable to function when there is soil disruption, contaminants in the soil including fungicides, and excessive fertilizer application, especially fertilizers containing soluble forms of phosphate. The reason for this is that in nutrient-rich, and also adequately watered soils, plants are less dependent on mycorrhizae causing the fungi to retreat and remain inactive.

The Rose-Phosphorus-Mycorrhizae Connection

In her article entitled The Myth of Phosphate, Part II Dr. Linda Chalker-Scott, associate professor and extension urban horticulturist at Washington State University, states that although there is plenty of rose literature advocating phosphorus fertilizer for root and flower growth, she finds no scientific evidence that roses need high levels of phosphate. In fact, studies show that excess phosphorus in the soil is detrimental to plants and can result in leaf chlorosis. This is because excess amounts of phosphorus in the soil limit the uptake by the plant of other essential nutrients such as iron, manganese and zinc. Chalker-Scott writes that like most other perennial landscape plants, roses are rarely deficient in any nutrient other than nitrogen. “Addition of any non-deficient nutrient to a landscape is a waste of time and money, and can injure soil organisms.” She adds that this is particularly true of the mycorrhizal associations that occur between various fungi and plant roots. In another article, Mycorrhizae. So, What the Heck Are they Anyway? Chalker-Scott states that numerous studies have shown that when a plant senses that its tissues or the soil contain enough phosphate, it no longer needs its mycorrhizal partner and so becomes less receptive to infection by mycorrhizal spores. She stresses plainly that phosphate fertilizer is deadly to mycorrhizal associations, “To encourage these hard-working and beneficial fungi in your plant community, you’ve got to cut down the junk (plant) food — stop using phosphate fertilizer.”


Encouraging Mycorrhizal Colonization

To encourage mycorrhizal colonization, Chalker-Scott stresses the avoidance of over-watering and over-fertilization. She continues that conservative additions of nitrogen or organic material increase mycorrhizal infectivity; warm temperatures favor mycorrhizal colonization; and mild drought, nutrient deficiency, the reduction of pesticide use and tilling, and an increase in the diversity of plant material promote increased numbers and biodiversity of mycorrhizal species.


Mycorrhizal Amendments

Mycorrhizal amendments are marketed and available for sale in various liquid and powdered forms in addition to being present in some fertilizer blends. Should we spend our money buying these products, and our time in applying them? Chalker-Scott reports that scientific studies have found no significant value in the addition of packaged mycorrhizae to healthy soils so their application is a waste of money and resources. She advocates instead that the best way to cultivate beneficial microbes is the addition of organic matter and “thoughtful, sustainable horticultural practices.”


Over-application of fertilizers, pesticides and fungicides detrimentally impact our soil system. The ‘less is more’ method of adding judicious amounts of nutrients to our soil only when needed, and gardening practices based on scientific studies are the best way to improve our soil and facilitate beneficial mycorrhizal activity. My research has convinced me to get that long over-due soil test.

Alfalfa Tea

Alfalfa tea is a great spring or fall potion that doesn’t interfere with normal seasonal processes.

Alfalfa tea releases a growth hormone that makes everything work better.

Just add 10 to 12 cups of alfalfa meal or pellets to a 32-gallon plastic garbage can (with a lid), add water, stir and steep for four or five days, stirring occasionally.

You may also “fortify” with 2 cups of Epsom salts, 1/2 cup of Sequestrene® (chelated iron, now called Sprint 330) or your favorite trace element elixir. The tea will start to smell in about three days. Keep the lid ON.

Use about a gallon of mix on large rose bushes, 1/3 that much on mini’s. And keep the water going. When you get to the bottom of the barrel, add water to fill it up again!

One load of meal or pellets will brew up two barrels full, but add more fortifiers for the second barrel. You’ll see greener growth and stronger stems within a week!

 
Learn to Read the Leaves

Learn to Read the Leaves

Rita Perwich

Consulting Rosarian, San Diego Rose Society

Roses & You, June 2020

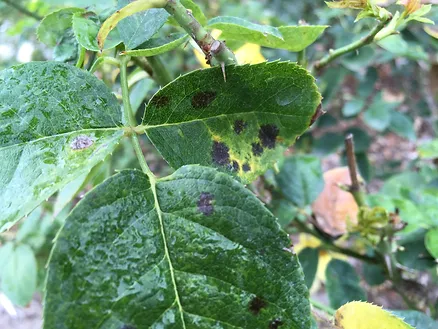
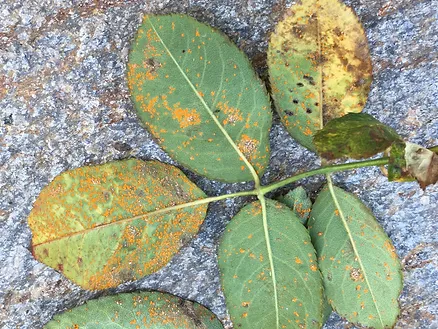
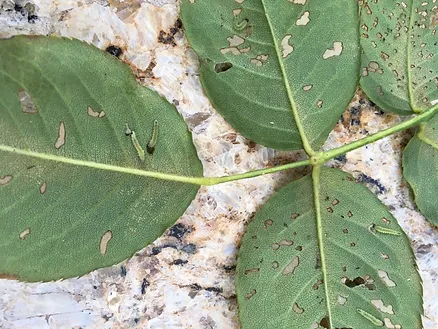
Unblemished lush green leaves are a good indication that our plants are thriving, well watered and happy. Leaf abnormalities, on the other hand, are often signals that our roses are under attack or in distress. Causes are varied and can be due to environmental problems, chemical toxicities, mineral deficiencies and fungal and viral pathogens. A plant will respond to these conditions with symptoms that include wilting, spotting, color irregularities or misshapen leaves. Pests leave telltale signs of their presence with damage such as distorted leaves, webbing and holes. Identify trouble by learning to read your roses’ leaves, and then take action when appropriate.

Environmental Problems

Yellow or Brown leaves can have several very diverse causes:

Yellow leaves that drop can be a sign that there is not enough oxygen in the soil. This is often caused by over watering or inadequate drainage. On container plants, make sure the drainage hole is not plugged, and in very clay soils, consider growing your roses in raised beds.

On the opposite spectrum, yellow, drooping and wilting leaves, or leaves with brown tips can mean that your plant needs more water.

Don’t panic if your otherwise healthy and vigorous plant has some yellow and brown leaves. It is normal for old leaves to turn yellow, then brown and drop.

Leaves that are Distorted and Deformed. Phytotoxicity is the toxic effect on a plant due to compounds such as pesticides, herbicides, metals and salts.

Needle-like shoots and leaves are an indication of glyphosate (Roundup) damage. Even the tiniest amount of spray drift can injure your roses.

Burnt or brown tips and blotches. Fertilizer burn or pesticide toxicity can show up as brown or burnt leaf tips or leaf edges, or blotches on the entire leaf surface. Nutrient toxicity, the accumulation of soluble salts in the soil, is common in the rose garden especially with constant use of synthetic fertilizers. In addition to tip and marginal browning of leaves, it can stunt plant growth by interfering with water availability in the root zone. Salts must be leached from the soil by deep watering. Always follow fertilizer and pesticide label directions, do not over-fertilize and water your roses before and after you apply fertilizer. Improve soil drainage and the overall health of your soil with the addition of organic fertilizers and mulches.

Common Nutritional Deficiencies

When a plant lacks a required nutrient for growth, symptoms include reduced shoot growth and leaf size, yellowing of leaf tissue due to a lack of chlorophyll or death of plant tissue. Our roses need the primary nutrients, nitrogen (N), phosphorus (P) and potassium (K). They also require three secondary elements, calcium, magnesium and sulfur, and trace amounts of the micronutrients, boron, chlorine, copper, iron, manganese, molybdenum, nickel and zinc. When you apply fertilizer, check that you are periodically using a product that includes all these essential elements for rose growth. Deficiencies of an individual nutrient can result either when there is an inadequate amount of a specific nutrient in the soil or it is unavailable to the plant often due to an incorrect soil pH. The ideal pH for roses is 6.5 If your soil tests too alkaline, sulphur or aluminum sulphate can be used to add acidity to the soil. The most common way to raise the pH is to add pulverized limestone to the soil.

The most common deficiencies in roses are nitrogen and iron.

Primary Element Deficiencies

Nitrogen Deficiency causes the leaves to have a uniform, light green to yellow-green color starting from the bottom of the plant. Leaves turn progressively more yellow. You may notice a reduction in leaf size, spindly stems and poor growth. Apply fertilizer with nitrogen, or amend the soil with blood meal, alfalfa and compost. A low pH can also cause nitrogen to be unavailable to the plant.

Phosphorus Deficiency may be indicated by leaves at the bottom of the bush turning a purplish color.

Potassium Deficiency shows in the older leaves first, with a yellowing and browning along the leaf margins. This deficiency may be one of the causes for the development of blind shoots.

Secondary Element Deficiencies

Magnesium Deficiency which is common in sandy soils is manifested first by older leaves which may cup down, be of reduced size or display chlorosis between the veins.

Sulphur Deficiency is suspected when leaves are light green with lighter-green veins.

Calcium Deficiency may be indicated when young leaves are distorted and older foliage become a dull green or curl down at the margins.

Some Micronutrient Deficiencies

Iron is an immobile nutrient so an iron deficiency will be apparent in the upper newer leaves. The veins on the younger leaves will be green and the remainder of the leaf will be yellow. If the deficiency is not addressed, the youngest leaves, including the veins, become very pale yellow and very small. Apply iron in chelated form which is more readily available for uptake and may be applied to either the soil or foliage. The leaf symptoms can also indicate an alkaline pH which binds the iron in a form that the plant cannot absorb.

Manganese Deficiency can cause interveinal chlorosis in the leaves and a netted appearance.

Molybdenum Deficiency may be indicated when the youngest growth shows wilting and there is tip scorching on the leaves.

Zinc Deficiency may be suggested by malformed and distorted new growth such as twisting of leaves or leaves that form a rosette.

Copper Deficiency may be the cause of young leaves developing light edges.

Boron Deficiency is possible when new growth ceases or withers, and when leaves do not develop or are distorted.

Fungal Diseases

Rose varieties vary greatly in resistance. Do your research and buy resistant roses. Lessen fungal disease by planting in the sun, spacing properly, pruning annually and maintaining a clean garden.

Powdery mildew can be identified by a white talcum-powder-like growth on the top and bottom of the leaves and stems. Plants with glossy leaves are often less susceptible to mildew. A high-pressure spray of water will remove mildew spores that haven’t imbedded themselves into the leaf but do this early in the day to prevent water-initiated rust and black spot.

Black Spot infected leaves are distinctive because the spots have feathery margins on the upper side of leaves. The affected leaves must be bagged up and removed to the trash.

Rust is very prevalent in cool, moist weather and can be a problem in coastal areas and in inland areas in wet years. The rust colored powdery pustules are on the undersides of leaves. Avoid overhead watering and dispose of all rust affected leaves on the plants and those that have fallen off.

Anthracnose has red, brown or purple spots that darken with age. This fungal disease does not seem to affect the vigor of the bush but cut out affected leaves.

Downy Mildew has angular purple, red, or brown spots that appear between veins on leaves and then become yellow and drop. This fungal disease requires moist, humid conditions to develop, and infected leaves and stems must be removed from the garden immediately.

Viruses

Rose Mosaic Virus can cause yellow zigzag patterns, splotching, mosaics, line patterns and dark green spots or streaks. The problem largely is unsightly and may possibly decrease plant vigor. The virus infects roses through the propagation of plants and is not vectored by insects.

Rose Rosette Disease New shoots will be bright red and deformed, leaves are obviously abnormal and very narrow. The virus is transmitted by the eriophyid mite. Plants suspected of RRD must be removed, including roots, and destroyed.

Insect and Mite Damage

Leaf-Sucking Pests:

Wrinkled New Foliage. Aphids love succulent tender new growth and can distort the new foliage. Knock aphids off with a forceful spray of water.

Black Sooty Mold. Copious amounts of honeydew secreted by sucking insects can result in the growth of sooty mold which blackens the leaves. Control ant populations which protect sucking pests from insect predators.

Misshapen, Distorted, Bronzed New Foliage. Chilli thrips attack fresh new foliage as well as buds. Look for bronzing on the underside of new misshapen foliage. This is a very hard pest to control. You must cut out and bag all new growth and may need to spray with Spinosad.

Stippled Leaves, Webbed Foliage. Spider mites are hard to see but cause leaves to be stippled or bleached. There is often a fine webbing on the underside of leaves. Defoliation can occur especially in hot weather. Control with forceful jets of water directed to the underside of leaves three to four times a week.

Leaf-Chewing Pests:

Skeletonized Leaves. Rose slugs look like small green caterpillars and feed on the underside of the leaf. Squish them with your fingers or remove the leaves. B.t. will not eradicate rose slugs as they are sawfly larvae and not caterpillars.

Leaves with large irregular-shaped holes. The brown fuller rose beetles chew foliage and flowers at night leaving notched or ragged edges. Drop the beetles in a bucket of soapy water.

Leaves with semi-circular holes. Leaf-cutter bees cut these holes in leaves to line their nests. Bees are important pollinators so take no action other than to admire their precision. .

Leaves rolled and tied in webs and leaves with irregular holes. The rose budworm and other caterpillars chew holes and some may tie leaves with silk. Hand-pick them and clip rolled leaves. You can spray with Bacillus thuringiensis (B.t.) which does not harm our beneficial insects, spiders or birds.

Leaves devoured. Grasshoppers chew leaves (and flower petals) and you should strive to catch them but you have to be fast!

Learn to read the leaves because healthy leaves guarantee beautiful blooms.

Rose Roots Love Humic Acid

Norma Boswell

Master Rosarian, Tri-City Rose Society

Roses & You, June 2020

In 2020, if you want to place a sweet treat at your roses’ feet, add humic and/or fulvic acid to the soil (and let earthworms create some for you). These acids are not fertilizers. They are wonder-working soil strengtheners that remain after plant matter has decomposed in a special place like a peat bog, your very own compost pile, or the intestines of earthworms. Humic and fulvic acid improve the soil in many ways: strengthening biological activity, increasing water retention, helping chlorophyll synthesis and aiding nutrient uptake. Humic acid can chelate micronutrients. Chelation breaks ionic bonds and increases micronutrients’ availability in the soil. Better soil health means better root growth. Better root growth leads to stronger, more beautiful roses.

You can, of course, ask your favorite local nursery whether they sell humic acid. An online source is www.spray-n-grow.com. Their bag of Earthworm Castings is 100% organic and contains 1% nitrogen, 0% phosphate and 0% potash. Spray-N-Grow also sells a kit of ten soil tests for $19.95. These tests reveal pH and status of nitrogen, phosphorus, and potassium.

Last year I was keen on buying bags and boxes containing mycorrhizae and digging them into the dirt. Mycorrhizae are fungi that develop a symbiotic relationship with plant roots. The roots provide mycorrhizae with food, and the long strands of mycelium created by mycorrhizae bring water and nutrients to the plants. At least two problems or doubts have recently come to light about mycorrhizae: (1) the exact kind of mycorrhizae that work best with roses is not clear, and (2) the main nutrient a plant gains from mycorrhizae is phosphorus.

Your rose soil may already have enough phosphorus. When a plant has plenty of phosphorus, its roots won’t encourage mycorrhizal development. If you do a soil test, you can discover your soil’s wealth or scarcity of phosphorus. Phosphorus tends to stay in the dirt for a long time (unlike nitrogen, which depletes quickly and needs to be replaced after the roses have bloomed). If your soil has a wealth of phosphorus, it could be a waste of money and effort to fertilize with more, which tends to cripple the mycorrhizal network. You might want to focus on humic/fulvic acid instead.

My container of Soil Moist Mycorrhizae Container Mix Plus (www.soilmoist.com) adds several species of mycorrhizae fungi and bacteria that grow naturally in undisturbed soils. My box of Whitney Farms’ Life Link Rose & Flower Food from a few years ago contains both ecto and endo mycorrhizae, as well as 4% nitrogen, 6% phosphate and 2% potash. Its fertilizers are derived from dried poultry manure, bone meal, sulfate of potash, alfalfa meal, feather meal and kelp meal.

SOIL TEXTURE IS IMPORTANT

Check the soil for drainage and soil texture. Soil should be “friable” (loose and crumbly). About 50% of the soil should be air and water. Roots grow well in friable soil but not compacted (smashed by foot traffic) or waterlogged (not well drained, drowning rose roots). Healthy soil provides space for many beneficial creatures to flourish, including microbes and earthworms.

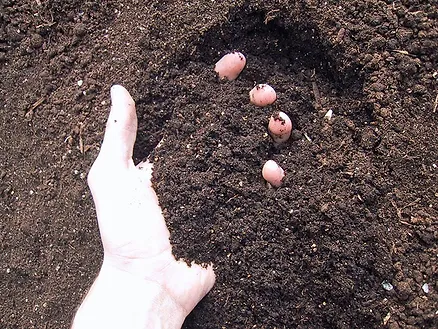
A good way to improve soil texture is to add compost. Compost consists of naturally decomposed organic material which adds carbon and nitrogen to the soil. Use your own compost, or buy bags of Dr. Earth compost from Fred Meyer or your favorite local nursery. The best product will be dark brown or black, moist but not soggy, have no recognizable wood, and give off no smell of ammonia or sulfur.

Earthworms will do a lot of texture and soil enrichment work for you. They can travel 3-4 feet in the dirt both vertically and horizontally. They ingest what they find, and excrete humus. The soil is efficiently aerated as they move.

PRODUCTS MUST HELP, NEVER HARM

Protecting our environment is paramount. What we choose to spray on our roses, and incorporate into their soil, must allow creatures that are beneficial to flourish. Read product labels. If contents can harm bees or kill earthworms, don’t use those products. Treat the insects that pollinate our crops, and the creatures that keep our soil workable, with wisdom and kindness. We and those we love will reap the rewards.

The Value of Alfalfa

My first memory of the word “alfalfa” will probably date me, since the first alfalfa that I remember was “Alfalfa” from the “Spanky and Our Gang” comedies. Alfalfa was a tall and lanky youngster with a freckled face and a wisp of hair that stood straight up at the back of his head. He was not too bright and his pants were too short, but his heart was usually in the right place. When we started growing roses in the 1990s, I learned about the other alfalfa – the food for rabbits and roses.

Alfalfa (Medicago sativa) is a member of the pea or legume family and is native to western Asia and eastern Mediterranean regions. The first record of alfalfa was in a book written by the Emperor of China in 2939 BC. The Greeks cultivated alfalfa starting around 500 BC for animal food and for some medicinal applications. Arab tribes named the plant “alfalfa”, which means “father of all foods”. Now alfalfa is widely grown and provides an important food source for many animals including horses, cows, rabbits and other domestic animals.

Why is alfalfa good for roses? As a fertilizer, alfalfa is 5-1-2, providing a good source of nitrogen, calcium, iron, magnesium, phosphorus, zinc, vitamins (A, D, B1, B6, E, K and U) and triaconatol, which is a fatty acid growth stimulant. Because of these beneficial components, alfalfa can provide roses many of the substances that they need to grow as well as stimulating growth.

Alfalfa can be used in many ways. Alfalfa meal can be worked into the soil around rose bushes. Normally one cupful per large rose bush and about one-half cup for miniatures is recommended. Alfalfa meal is also contained in many commercial organic products (e.g. Mills Magic Mix) because of its beneficial components. Alfalfa pellets can be used instead of the meal by again working the pellets into the soil around roses. The pellets will soon break down with watering or by rain to slowly release the trace minerals, triaconatol, and other important nutrients. Alfalfa pellets come in many sizes, depending on the animal for which they were intended. Alfalfa pellets for horse feed are much larger than similar pellets for rabbits. I usually buy pelleted rabbit feed that contains alfalfa for this purpose, as well as for making “tea”.

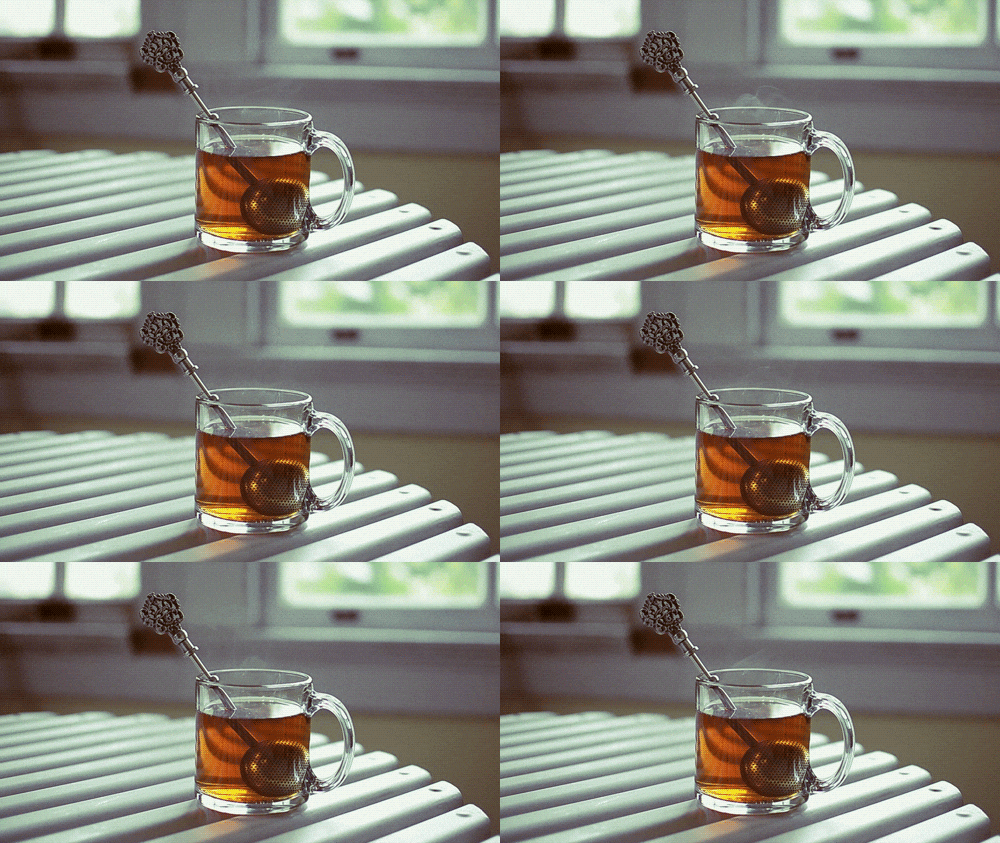
Alfalfa “tea” is another good way to provide the nutrients contained in alfalfa to the rose bush. In essence, by making a “tea” you are extracting the nutrients from the alfalfa product (meal or pellet) with water, much as you extract your tea bag to make a cup of Earl Grey or Constant Comment. To make alfalfa tea, put about eight to ten cups of alfalfa meal or pellets into a 30 gallon plastic garbage can, almost fill the can with water, cover and let bake in the sun for three to five days. Stir daily to make sure that the extraction process is well underway and to disperse any organic matter that has risen to the top of the water.

Eventually, the water extract will take on an orange color and the fibrous organic material will settle on the bottom of the garbage can. Now you are almost ready to give the roses a drink of your “tea”. Since I usually make alfalfa tea in the early and late summer, the water often gets very hot in the covered garbage can. For that reason, I try to put out the tea early in the morning.

But if I have to put out the tea after work, then filling the garbage can to near the top with the cool water from the hydrant helps cool down the tea and prevents damaging tender roots. I learned this lesson the hard way, by filling the garbage can up all the way at the beginning and burning some roots on my bushes when I applied the tea in the late afternoon without adding cooler water first. Now, I always leave room to add 5 or more gallons of fresh water to fill the can and cool the contents before applying morning or afternoon.

You can also fortify your alfalfa tea by adding additional ingredients before serving your tea. Water-soluble fertilizers, fish emulsion, and/or Epsom salts can be mixed with your tea to fortify the brew. Simply use the normal amount you would use in a regular fertilizer concoction or a little less to create the ‘drink of champion roses’! As with a regular fertilization program, give a gallon of the tea to large roses and about one-half gallon to miniature and mini-flora roses. Be careful not to stir up the organic material on the bottom as you dip out the tea.

After you have served the tea to your roses, the garbage cans should still have most of the fibrous material and a few gallons of liquid left in the bottom of the can. You can refill the garbage can with water and get a second extraction a few days later. After applying the second extract to your roses, you will need to dispose of the fibrous material. Some rosarians work the fibrous material into the soil of the rose garden as a soil amendment. However, you can also apply the alfalfa tea or the fibrous remains to other flowers. Our perennials especially like the leftovers, so we use all of the material, extract and solids.

So, if you see me carrying bags of rabbit food out to my car, rest assured that I haven’t gotten an Easter Bunny. I’m headed home to make tea!

Howard Walters’ Thought for the Month: “The trouble with good advice is that it usually interferes with our plans.” From the February, 2002 American Rose magazine.

This is a 2007 Award of Merit article